

Salesforce Winter '23 Flow Updates
With the Winter ’23 release, there have been a host of improvements and exciting new features with Salesforce Flow, all delivered to make building Flows in Salesforce easier and more functional for both the developer and the end user.
Let’s start with the Flow Builder itself and the new functionality that I’ve found particularly useful…
Cut and paste Flow Elements
In previous versions, in order to change the order of elements in the Flow we had to copy the element, paste it into the new location, then delete the old element and finally change the API name of the newly pasted element. With the new Cut & Paste functionality, we simply click on the relevant element and select ‘Cut Element’ from the menu. Then, hover over the + symbol where we’d like to paste it and click on the little Paste symbol that appears. The entire element is moved to the new location and we no longer need to modify its API name.
Of course, we also have the Copy & Paste functionality too but when copying an element, the API name of the newly pasted element will be prefixed with ‘Copy x of ‘ where x is a number, so you’ll likely still want to change the API name to something more meaningful.
Multicolumn Layouts
The Section component now allows us to create sections of up to four columns. Each Section component operates independently of any others on the screen and the Properties pane allows us to specify not only how many columns each section can have but also the width of each column. You can choose whether or not to add a Section Header and sections with a header will be collapsible and expandable by default. Visibility Rules can be created for the entire section which means we don’t have to create them for each individual component in the section.
More space when building Screen Flows
The new, enlarged Screen Editor gives us more space when laying out our screen components. This is particularly handy when working with screens using multi-column layouts. It’s also great that we can enlarge the Properties pane on the right-hand side of the screen editor; not a new feature but a very useful one when creating field validations.
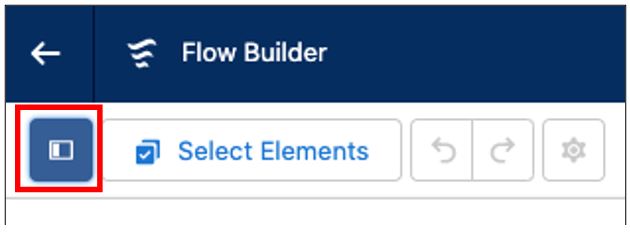
Collapsible Toolbox
While talking about screen space, this seems a good time to mention that the Toolbox is now collapsible too, giving us a larger canvas on which to build our flow. Just click on the ‘Toggle Toolbox’ button in the top-right of the Flow Builder to hide/show the toolbox.
Formula Builder
Prior to this release, we had to wait until we saved the Flow in order to parse our formula syntax and see any errors. With the Winter ’23 release, we’re now provided with an intuitive formula builder in Formula Resources and the Collection Filter element. Like when we’re creating formula fields, the new formula builder lets us find functions by type, walks us through the formula’s creation and we can click the ‘Check Syntax’ button as we work. It even provides a handy link to helpful function documentation!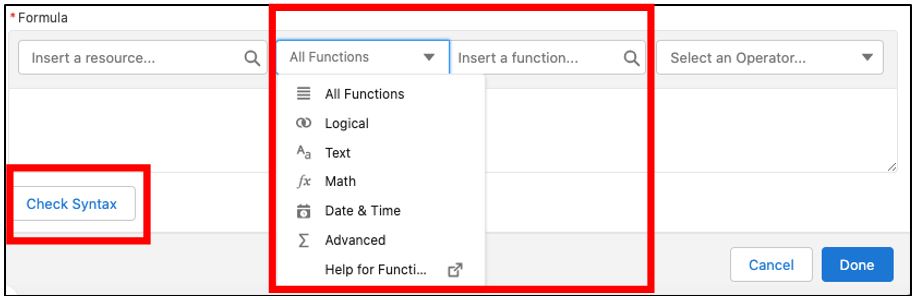
Filter Picklist Values by Record Type
Since Flows were first introduced, we’ve been unable to automatically filter record type restricted picklists to only show the relevant values, even if we provided the RecordTypeId. No longer a problem. Now, as long as we provide the RecordTypeId for a record variable, the picklist values will be filtered for that Record Type at runtime. If we do want the picklist to display all values, we have two options; either don’t provide the RecordTypeId or use a Picklist Choice Set instead.
![]() Don't forget to check out: Salesforce Winter Release '22 Highlights
Don't forget to check out: Salesforce Winter Release '22 Highlights
Creating Record Resources from the Fields Tab
In bygone days, when we created a record resource from the Fields tab we had to specify not only the resource but also the data type.
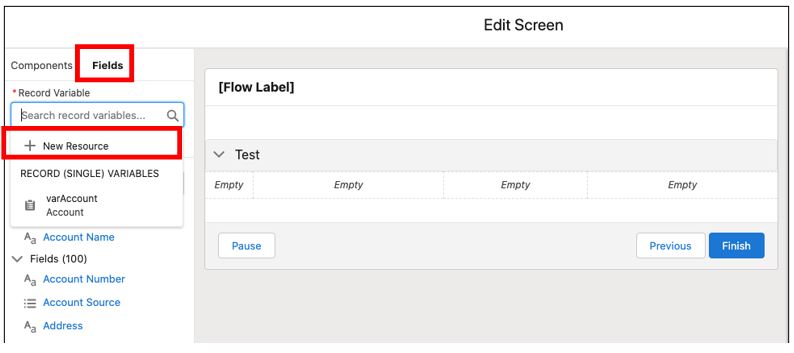
These days, the correct data type is selected for us automatically. Not a biggie but saves a few clicks making life a little easier.
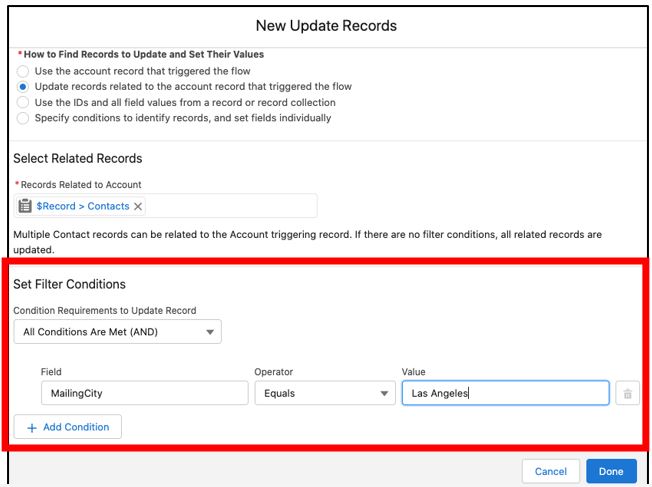
Update Related Records in Record-Triggered Flows
In Record-Triggered Flows the new release gives us the ability to update any child records related to the record that caused the Flow to fire via the Update Records element. To do so, we select the option to ‘Update records related to the objectName record that triggered the flow’. Then, specify the set of child records to update.
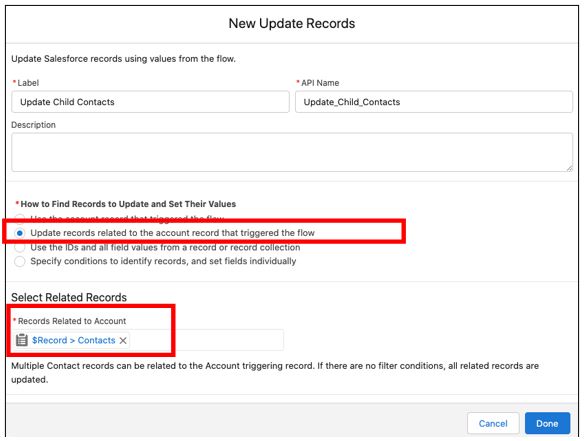
We don’t have to update ALL the child records, we can use filters to specify criteria that the child records must meet in order to be updated.
Avoid hitting Governor Limits with the new IN and NOT IN Operators
Now, this new feature really has been a long time coming and is very, very welcome.
How many times have you had to do something like loop through a collection of Accounts and for each one, retrieve the related child Contacts? And how many times have you found your Flow fails because you’re hitting the Governor Limit for ‘Too many SOQL Queries’? That limit is 100 per transaction. Grrrr, I feel your pain!
The problem arose because let’s say your original collection of Accounts contained more than 100 elements. You then had to loop through that collection of Accounts and for each one, use a GetRecords element to retrieve the child Contacts. Each execution of the GetRecords element issued one SOQL Query, thus you end up issuing more than 100 queries, blowing the Governor Limit out of the water.
Well, fret no longer. The new IN and NOT IN operators work in much the same way as they always have in a SOQL Query. Our GetRecords element can now use a collection of primitive values (text, number, date, date/time, currency & Boolean) to find the related records.
Unfortunately, we still can’t access values on records in collections so instead, we have to loop through the elements in the record collection and add their values (such as the Id) to another collection of one of the primitive data types listed above.
We can then use that collection of primitives in a single GetRecords element with the IN operator to retrieve the child records; thus significantly reducing the number of SOQL queries to just 1!
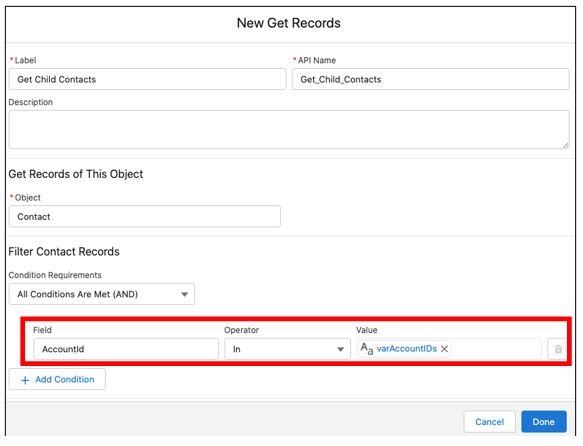
The IN and NOT IN operators can be used in the UpdateRecords and DeleteRecords elements too.
And these are just the new features that I’ve used! This release also includes the following new Flow Builder abilities:
- Use the ISCLONE function in record-triggered flow formulae
- Use of Lightning Web Components to launch Screen Flows
- Control over screen visibility based on Dynamic Forms for Flow Picklist Values
- Generation of Choice Options from External Data
- Scheduled paths can now use Months for the Time Offsets
- See all incoming Go To connections in the Toolbox
From a Runtime perspective, the Winter ’23 release includes a couple of nifty enhancements to existing components.
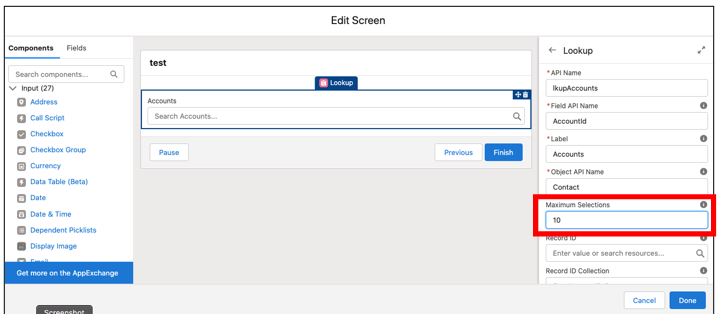
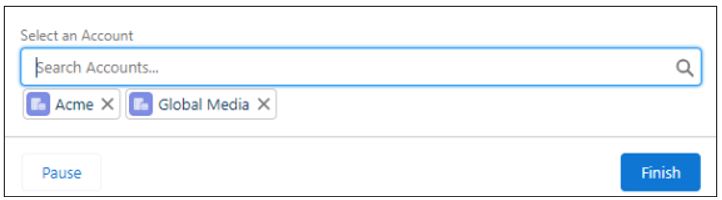
Select multiple Records in the Lookup screen component
The Lookup screen component now allows us to search for and select multiple records. When you add the component to a screen element, simply specify the Maximum Selections field value as greater than 1 in the properties pane.
![]() Check out another amazing blog by Stimulus Consulting here: Why Should you Invest in Salesforce Training and Change Management?
Check out another amazing blog by Stimulus Consulting here: Why Should you Invest in Salesforce Training and Change Management?
Select multiple Records from the Table screen component
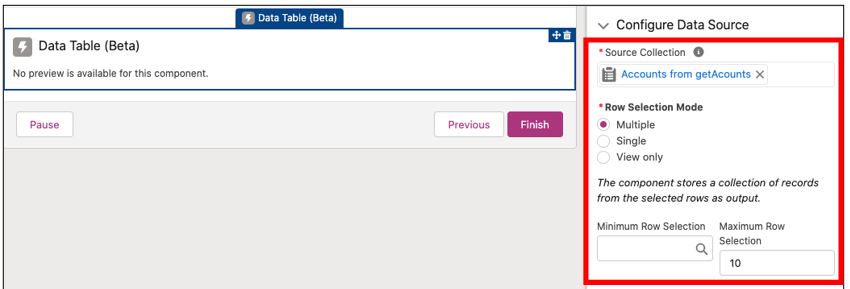
Currently, in Beta, the new Data Table component allows us to display a list of records. Configuration settings for the component will specify the data source, which needs to be a collection of records, so this needs to be created earlier in the Flow and we can also determine whether the table will be rendered as a read-only list or whether we’re going to allow users to select one or multiple rows; which we can then use later on in the Flow. If we’re allowing users to select multiple rows, then we can specify a minimum and maximum number.
Finally, we tell the Data Table which fields we’d like to display as columns in the table.
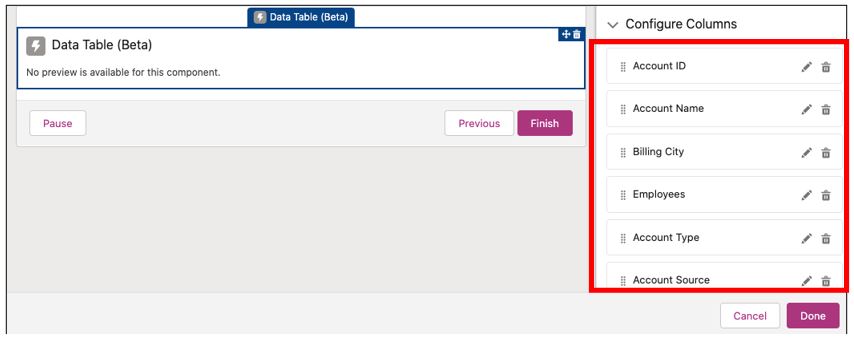
I’ve tested with 25 columns and didn’t hit a limit although I have to admit that the table didn’t render very nicely; all the columns were too narrow and the properties don’t allow us to specify their widths. So, in future, I’ll try to stick to no more than 10-12 columns.
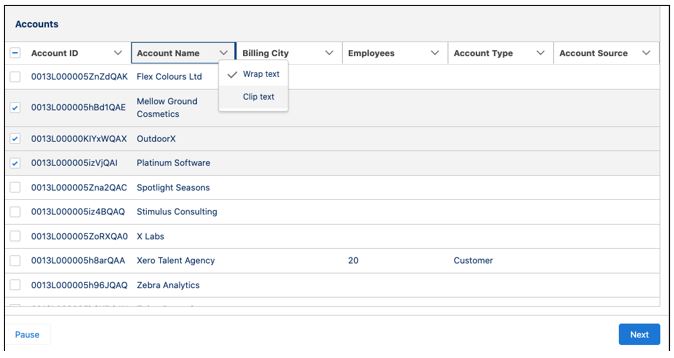
The column headers allow the user to drag to change the width and also choose whether to wrap or clip the contents. Unfortunately, there doesn’t appear to be any ability for users to click on the column headers to sort the data, so I used a Collection Sort component in the Flow before rendering the collection in the Data Table.
Here’s the end result…
Any rows that a user selects are stored in a collection as the output of the component and can then be referenced later in the Flow.
Visit our blog for more Salesforce Winter '23 updates.


Responses