

Email Service-Inserting Data in Salesforce using Email Attachment
Force.com provides us powerful and secure functionality for sending and receiving emails. We can execute our apex logic whenever we receive an email. By using Email Service, we can also shoot out emails to the desired recipients from within the Salesforce platform.
Follow the following steps--
1. Create an Apex Class which will be executed when the email is received, it should implement the Interface “Messaging.InboundEmailHandler”.
Sample Code-
global class EmailServiceHandlerClass implements Messaging.InboundEmailHandler {
    global string MyFile{get;set;}
    global string finalString;
    list leadList = new list();
    list filelines = new list();
    list finalStringList = new list();
    global Messaging.InboundEmailResult handleInboundEmail(Messaging.InboundEmail email, Messaging.InboundEnvelope envelope) {
        // list to collect all binary attachments from the email recevied.
        list listOfAttachments = new list();
        Messaging.InboundEmailResult result = new Messaging.InboundEmailresult();
        try {
            for (Messaging.Inboundemail.BinaryAttachment tAttachment : email.binaryAttachments) {
                MyFile = tAttachment.body.toString();
            }
            /* your logic as to how you want to traverse your attachment.I just splitted my text file with each new line character “\n” */
            filelines = MyFile.split('\n');
            for(String str : filelines) {
                str = str.trim();
                system.debug('str:: '+str);
                if(str.startsWith('02')){
                    finalStringList.add(str);
                    for(String finalString : finalStringList){
                        if(finalString.length()>365 && finalString.length() <= 400){
                            Lead le = new Lead();
                            // code to fill lead fields.//
                            leadList.add(le);
                        }
                    }
                    insert leadList;
                    result.success = true;
                }
            }
        }
        catch (Exception e) {
            result.success = false;
            result.message = 'Due to Technical Reasons,Your data cannot be Inserted.';
        }
        return result;
    }
}
The Messaging.InboundEmailHandler Interface used in creating the apex class defines the method
global Messaging.InboundEmailResult handleInboundEmail(Messaging.InboundEmail email, Messaging.InboundEnvelope envelope) {}
In these two arguments are utilized “Messaging.InboundEmail email” and “Messaging.InboundEnvelope envelope”
All the message contents are available through in “Messaging.InboundEmail email” while “Messaging.InboundEnvelope envelope” provides the 'to' and 'from' addresses.
Messaging.InboundEmailResult result = new Messaging.InboundEmailresult();
The Messaging.InboundEmailResult is an object in salesforce to process the result of the Inbound email Process.
Its always a best practice to show whether the processing of the class is successful or it is failed. So for this, we should create a result so that the sender will get notified about the process initiated.
result.success = false;
result.message = 'Due to Technical Reasons,Your data cannot be Inserted.';
return result;
In case your process gets failed, the inbound email gets rejected and the sender will receive an email with the body as “result.message” you provided.
2. Now create an Email Service in your salesforce org and then configure it to bind with the inbound handler apex class created above. For this follow the steps: Setup -->Quick Find box --> Search “Email Service” --> Click “New Email Service”
Below is the screenshot of what it will look like.

3. Assign a name to your email service and the apex class you just created that implements the Messaging.inboundemailhandler interface. Leave all other as defaults and Hit Save button.
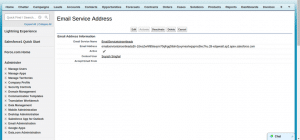
4. You need to generate an email address on which Force.com will listen for incoming emails. For that Click on New Email Address and fill all the required fields here.
You can restrict the email address from which this email service will be processed by putting comma separated email addresses in the Accept Email From field. Put all other as default and Hit save button.
Below is the screenshot what it will look like after you save the email address:
Send a mail to above generated email Address along with the attachment. You can now verify the data in you org if their is no exception generated in your code.


