

Top 10 Features in Salesforce Summer ’19 Release
Salesforce releases over a whopping 150 new features three times a year during its seasonal releases: Spring, Summer, and Winter. And one of the most awaited Salesforce Summer ’19 Release is here. So, here’s a roundup of our Top 10 favorite Salesforce Summer ’19 Release features and how you can leverage them to get the maximum out of Salesforce. Let us know which one’s your favorite!
Our Favorite Picks: Salesforce Summer ’19 Release
1. Give New Users a Great Start to High-Velocity Sales
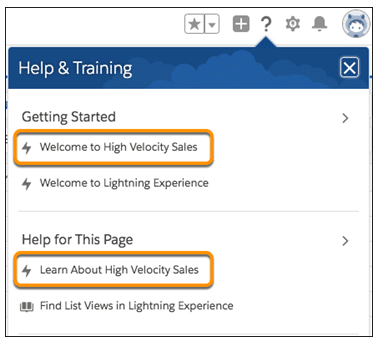
One of the most significant Salesforce Summer ’19 Release highlights is that new users have a slew of resources available to them when starting with High-Velocity Sales. Our new welcome experience includes links to training videos, Trailhead content, and in-app user assistance. Sales managers and reps can pace themselves on what they need to know to work effectively with High-Velocity Sales.
Where: This change applies to High-Velocity Sales in Lightning Experience. In the Salesforce Summer ’19 Release, high-velocity Sales is available for an extra cost in Enterprise, Performance, and Unlimited editions.
Why: Users are presented with a welcome mat the first time they open the High-Velocity Sales app.

Users see different resources depending on whether they’re a sales manager or a sales rep.
After users see the welcome mat, they get access to the docked assistant.

The docked assistant shows everything available in the welcome mat and also a few more resources. With the “Dive in” content, sales reps and managers are given a tour of the product’s major features without leaving the app. Users can walk through the fundamentals of setting up and using High-Velocity Sales with in-app assistance at their side.
In the Salesforce Summer ’19 Release, the welcome mat and docked assistant are always accessible from the Help Menu.
2. Merge Cases into a Single Record (Beta)
If you have duplicate cases or cases that you want to merge into a single case, with the Salesforce Summer ’19 Release, you can now merge two or three cases into one master record. When you merge cases, the master record is updated with your chosen field values. Most related lists, feed items, and child records are merged into the master record. The master record keeps the Chatter feeds, your values for read-only and hidden fields (except Created Date and Created By), related items, and security.
How: In a Cases list view, select two or three cases, and click Merge Cases. You can merge cases from custom list views as well. You can’t merge from the Recently Viewed list, but you can merge from the Recently Viewed Cases
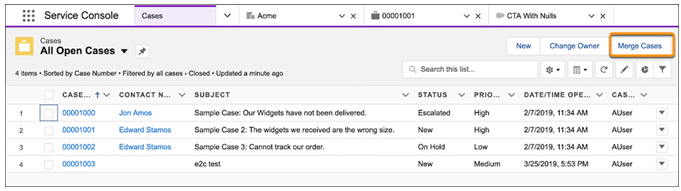
You can also start a merge from within a case and add the other cases to merge.

Select the field values to merge into the master.

3. Increase Manager Productivity with a New Task Filter
Sales managers want to focus on the tasks that their team is working on. Now with the Summer ’19 Release Features, it’s easy to do it with the My team’s tasks filter.
Where: This change applies to Lightning Experience in Essentials, Professional, Enterprise, Performance, and Unlimited editions.
Why: Within your list view, select the My team’s tasks filter.

4. See Which Objects Were Searched at a Glance
On the search results page, it’s easier for users to see which objects were searched and how many results were found. No more wasted time guessing.
Where: This change applies to Lightning Experience in all editions.
Why: The Top Results page shows the best results for the objects you use most. In the sidebar, objects are listed in order of relevance, so the best matches are at the top, just like they are in the search results page. Prior to the Salesforce Summer ’19 Release, objects in the sidebar were listed in the same order as your Lightning Experience navigation tabs.

When you have more than five results, we show “5+” on the Top Results page. Click the object name to see the complete list.
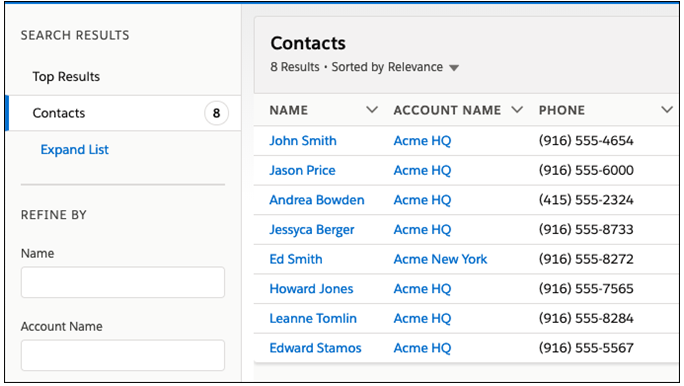
Don’t see what you’re looking for? Click Expand List and select another object. If an object doesn’t have a count next to it, click the object’s name to search it.
5. Send Surveys for Free
Licenses can be tricky, so we got rid of them. You no longer need a license to create and send surveys. Anyone who has been assigned one of the provided four profiles can create and send unlimited surveys for free.
Where: This change applies to Lightning Experience in Performance, Partner Developer, Enterprise, Developer, and Unlimited editions where Salesforce Surveys is enabled.
How: Enable surveys, and assign one of the profiles to users who create and send surveys.
- Contract manager
- Marketing user
- Standard user
- System administrator
6. Choose from Two Record View Options
Now you have two record page view default options. Choose between the current view—now called Grouped view—and the new Full view. The full view displays all details and related lists on the same page. If you’re transitioning to Lightning Experience, this view is similar to Salesforce Classic.
Where: This change applies to Lightning Experience in Group, Essentials, Professional, Enterprise, Performance, Unlimited, and Developer editions.
Why: We’re giving you more out of the box options so that you can choose a view that fits your users’ business needs and preferences. In addition to the view that currently exists, we’ve added Full view, an alternative view. Full view (1) displays all details and related lists on the same page. Grouped view (2), the original Lightning Experience record view, focuses on specifics by grouping information across tabs and columns.
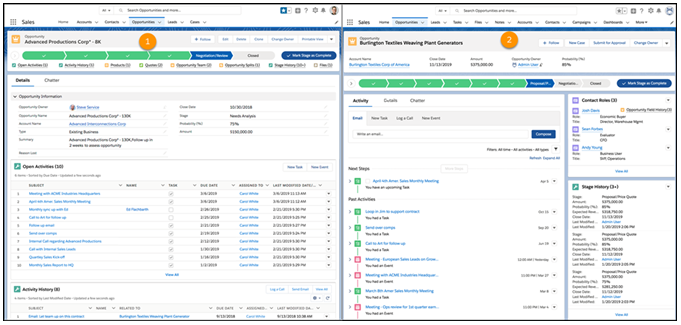
If you’re transitioning to Lightning Experience, Full view is similar to Salesforce Classic.
How: If you’re already using Lightning Experience, you can change your org’s default record view in Setup. If you turn on Lightning Experience after Summer ’19, you configure these settings in the Lightning Experience Transition Assistant before you enable Lightning Experience, or in Setup after enabling Lightning Experience.
In Setup, enter Record Page Settings in the Quick Find box, and select Record Page Settings.
7. Path: Celebrate Sales Milestones
Help your teams celebrate their successes. Toss some virtual confetti when reps reach a designated path stage, for example, winning an opportunity. You can choose the frequency, such as always for those hard-won victories or only sometimes for daily occurrences. Celebrations don’t work on the status Converted on leads.
Where: This change applies to Lightning Experience and all versions of the mobile app in Essentials, Group, Professional, Enterprise, Performance, Unlimited, and Developer editions.
Why: A confetti celebration creates a little fun when reps reach a milestone.

8. Keep Sales Quotas in Sight with a Few Clicks in Lightning Experience
Say goodbye to Data Loader and the API, at least when it comes to managing quota data. Now you can easily add and update quotas on the new Forecasts Quotas page in Setup.
Where: This change applies to Lightning Experience in Professional, Performance, and Developer editions and in Enterprise and Unlimited editions with the Sales Cloud.
Who: Users with the Manage Quotas and View All Forecasts permissions can manage quotas in Setup for all users in the forecast hierarchy.
How: First, make sure that you’ve enabled quotas. If quotas are enabled, you’re good to go.
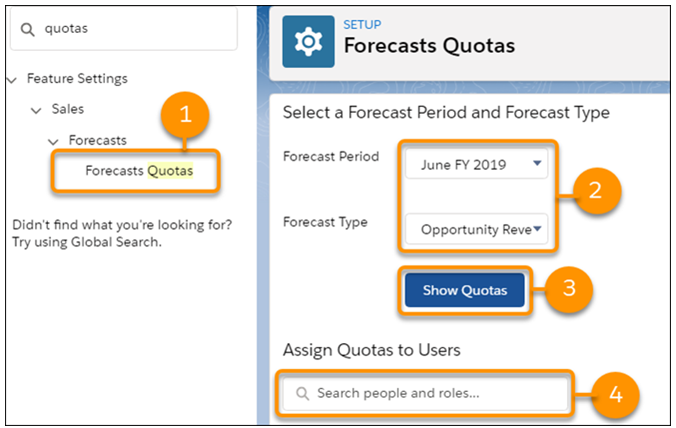
- Use the Quick Find box in Setup to get to the Forecasts Quotas page (1).
- Select the forecast period and forecast type of the quotas you want to manage (2), and then click Show Quotas (3). If you select a product family forecast type, you specify a product family.
- Search for (4) and select the users, roles, or territories whose quotas you want to manage.

- Click Edit Selected Rows (5), enter quota amounts or quantities (6), and save your changes. You can also click the pencil icon in quota and currency fields.
9. See More in Item Menus on the Navigation Bar
We increased the number of recent items shown in item menus from three to five. We also made some styling enhancements, including bold section names and separators, to make it easier to tell the different sections apart.
Where: This change in Salesforce Summer ’19 Release applies to Lightning Experience in Group, Essentials, Professional, Enterprise, Performance, Unlimited, and Developer editions.
Why: An object’s item menu now displays up to five items each in the Favorites, Recent records, and Recent lists sections.
10. Power Up Your Related Lists with Enhanced Related Lists
Take your related lists to the next level. With Enhanced Related Lists, you can show up to 10 columns, resize and sort your columns, perform mass actions, and wrap text.
Where: This change applies to Lightning Experience in Essential, Group, Professional, Enterprise, Performance, Unlimited, and Developer editions.
How: From the related lists component in the Lightning App Builder, select Enhanced List from the Related List Type dropdown (1). You can customize how many records to display at once, and choose whether to show the list view action bar.
Choosing Enhanced List affects all related lists in the component (2). To customize which columns appear in a particularly related list, edit the related list in the page layout editor and add more fields.

Which one of the above Salesforce Summer ’19 Release features do find most useful? Please share your thoughts in the comments section below. Also, watch this space for the latest Salesforce releases and other updates!


