

Send Email to Salesforce Sales Cloud Data from Marketing Cloud Using Import and Automation Filter Activity
Go through this blog to have a better understanding of how import and automation filter activity works in Salesforce Marketing Cloud.
Requirement:
We want to fetch Salesforce data from the Sales cloud into the marketing cloud and then use the automation studio to create an automation process and then shoot an email to the Salesforce data which we have saved into the Data extension in the marketing cloud.
Scenario implemented into account:
We want to retrieve all the contacts into the marketing cloud and then segregate the data into one data extension and send them an email.
To achieve the above scenario, we will commence as given below:
1. In the marketing cloud under Email Studio > Interactions > Import. We will create an import definition. This will import all the data present in the report into the marketing cloud.
We will select file location as ‘Salesforce objects and reports’ and then under the objects section we will select ‘Contact’. In the next part, we will select the fields which we want in our Data Extension.
If we want to import data from a Salesforce report then we opt for the reports option under File location.
What import does is it will automatically create a data extension with the name matching with import name.

![]() Don't forget to check out: How to Import Reports From Salesforce Sales Cloud Into Marketing Cloud Using Imports
Don't forget to check out: How to Import Reports From Salesforce Sales Cloud Into Marketing Cloud Using Imports
2. Now we will navigate to the Email studio and under Subscribers > Data Filters, will create a data filter that will be used to filter out records as per the filter defined. You can define the filter as per your requirement.
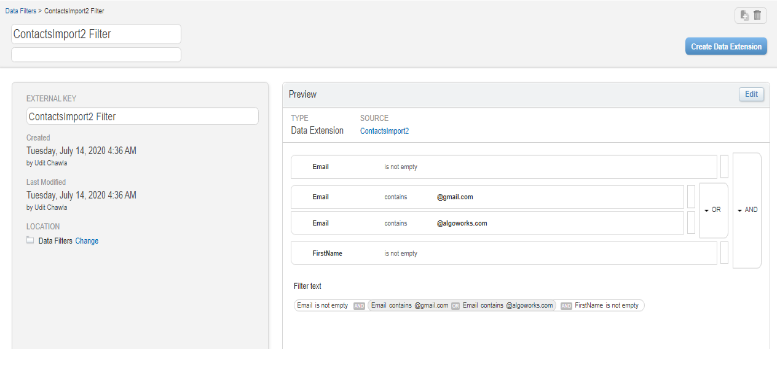
3. After creating the data filter what we will do next is navigate to Automation studio and under activities, we will create a filter activity, filter activities help us to create a data extension automatically by configuring the data filters which we have defined in the Email Studio.

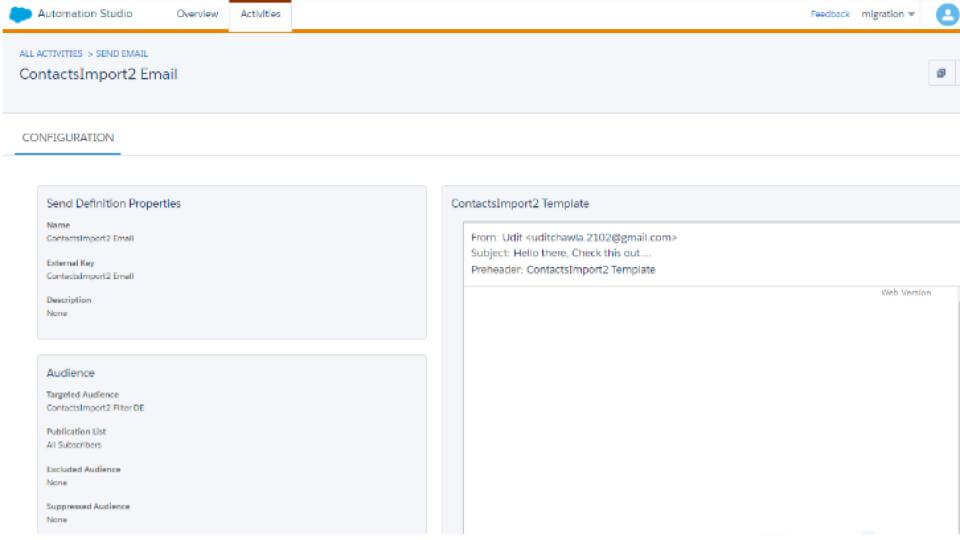
4. We also need to create an email template to send an email to our contacts. We can create templates in the Content Builder. After creating the templates we will create send email activity and configure the same by using the template which we created and also we will define the target audience (Data Extension which got created automatically by Filter activity in Automation) in send email activity.
As of now, we have created all the activities which we are going to use in our automation. Now we will configure the automation as below:
(i) Imports: Will configure the import activity which will import all the data from the Salesforce sales cloud to the marketing cloud.
(ii) Next configure the data filter in the email studio and then use the data filter in Filter activity in Automation Studio in order to create a Filtered Data extension that will store our filtered out records.
(iii) In the final step we will use the Send email activity which is going to send the email template to the target audience defined.
(iv) We can schedule the automation as per different frequencies available.
![]() Check out another amazing blog by Udit here: How to Send Email to Salesforce Sales Cloud Data from Marketing Cloud
Check out another amazing blog by Udit here: How to Send Email to Salesforce Sales Cloud Data from Marketing Cloud
Here is the screenshot of the complete automation which we are going to configure in order to send email to our Sales cloud records:

We can schedule the automation as per our requirement and after doing all the above-mentioned things, you just need to save the automation and then activate it.


Responses