
Detailed Guide to Implement Salesforce Multi-Factor Authentication (MFA)
Plan To Implement MFA
Configuring Permission Set in Salesforce
- Login in to your Salesforce account
- On the setup page, search “Permission Set”
- Click the “New” button to create a new permission set for the user and enter the label name. The API name will automatically generate, then click the “Save” button.
Figure 1: New Permission Set
- After saving, scroll down and click “System Permissions” under the system section in the created permission set. Then click the “Edit” button.
Figure 2: Edit System Permission
Enabling and Configuring MFA in Salesforce
- Scroll down or search “Multi-Factor Authentication for User Interface Logins” and enable the check box. To save the update, click the “Save” button.
Figure 3: Check Multi-Factor Authentication for User Interface Logins
Don't forget to check out: Salesforce Multi-factor Authentication/Two-factor Authentication End User Training Video
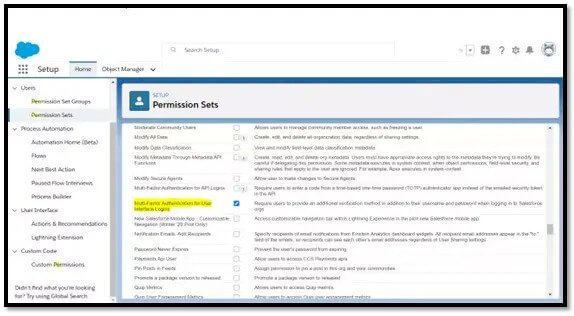
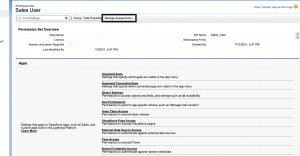
Add User to Permission Set
- Click the “Manage Assignments” button and then click the “Add Assignments” button to add users.
- Click the “Done” button and activate the created permission set.
- Log out of your Salesforce account.
Figure 6: Log Out of Account
Download and Install the Salesforce Authenticator
- Download and install the “Salesforce Authenticator” application from your mobile device’s app market.
Figure 7: Download Salesforce Authenticator
- Open the “Salesforce Authenticator” app and click “Add an Account.”
Figure 8: Open Salesforce Authenticator
- On your mobile device, the app displays a two-word phrase authenticator. Hold that word on your mobile device.
Figure 9: Two-Word Phrase in App
Test MFA in Salesforce
- Log in to the Salesforce account that created the permission set.
Figure 10: Account Login
- After clicking on the login button, the “Connect Salesforce Authenticator” page will be opened. Enter the two-word phrase from the Salesforce Authenticator application and then click the “Connect” button.
Figure 11: Connect Salesforce Authenticator Page
- Now, check your Salesforce Authenticator app; it will prompt you to connect with the authenticator. Click on the “Connect” button.
Figure 12: Connect Account Request Page
- Your mobile device now displays your username and service name. Check the details after clicking the “Connect” button on your mobile device.
Figure 13: Username and Service Name Details
Check out another amazing blog by SP Tech here: How Does Salesforce CRM Empower Insurance Organizations?
- If successfully connected, you’ll be automatically redirected to your Salesforce account’s main page. You can log out of this session to test your multi-factor authentication.
Figure 14: Log Out Current Account Session
- Again, enter your login credentials and then click the “Login” button.
Figure 15: Log in to Your Account
- Check your Salesforce Authenticator app; it will prompt you to approve this login or not. Click the “Approve” button to approve this login session.
Figure 16: Salesforce Authenticator App with Details
- Your login is approved; you’ll be automatically redirected to your Salesforce account’s main page.
Reference: SP Tech
Responses