Create a List View in Salesforce Lightning Experience
ListView allows you to see a filtered list of records, such as contacts, accounts, or custom objects. In list views, you can only see the data that you have access to. You see records that you own or have read or write access to, and records shared with you. List views also include records owned by or shared with users in roles below you in the role hierarchy. You can see only the fields that are visible according to your page layout and field-level security settings. The steps below are for Lightning Experience.
NOTE: If you see the App Launcher icon (
) on the left side of the navigation bar at the top of your screen, you're in Lightning Experience. If you don’t see that, then you're in Salesforce Classic.By clicking
, you can take actions for list views are available in the List View Controls menu.- Go to ListView Controls and select New button.
- Enter a List Name.
- Here you can choose who can see this list view: just you, or all users, including Partner and Customer Portal users.
- Now click on Save button.
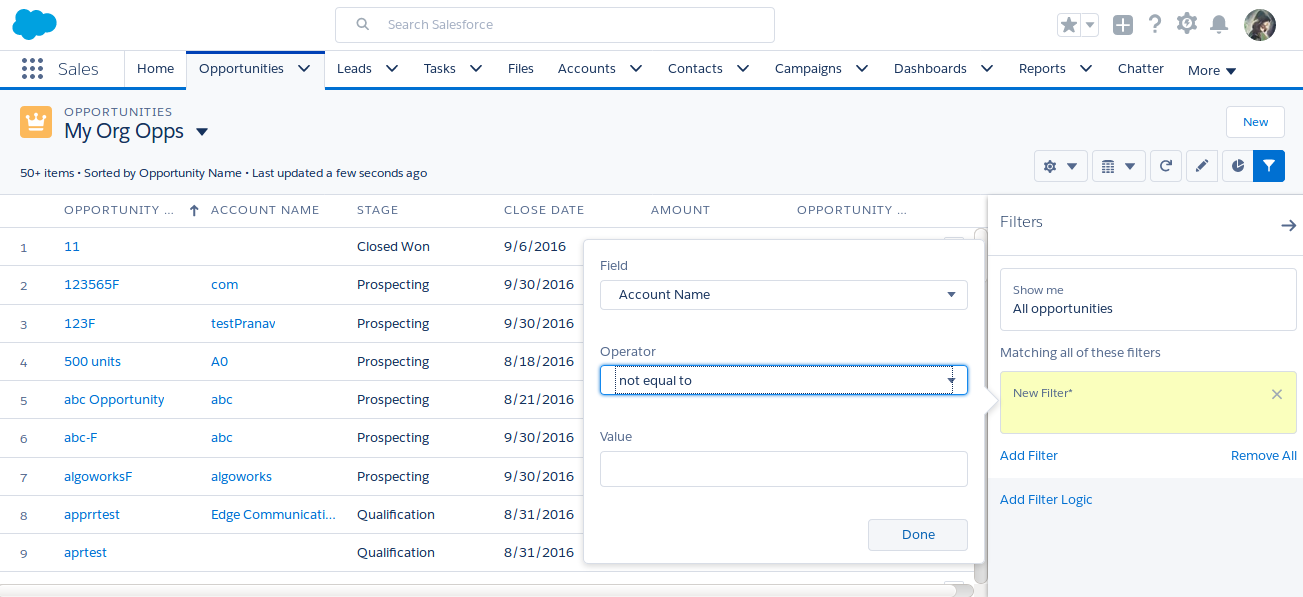
- Now the Filters panel appears. So you can Add and Set filters to view only the records that meet your criteria. Here you have different options and operator depending on the field you want to filter.
- Filters support values only between 1 and 2,147,483,648 or between the minimum and maximum for a signed 23-bit integer. NOTE: A value outside of this range disables that filter.
a) Now click Add Filter.
b) From the New Filter drop-down menu, select the field to filter.
c) From the Filter by... drop-down menu, select an operator. For example, choose equals, starts with, or does not contain.
d) For Value, make a selection or enter a value.
e) Click on Done button.
f) To set another filter, you can click Add Filter.
g) To remove a filter, you can click near the filter name.
- Click Filter Logic to add logic that further refines which records appear in your list view. Use the number assigned to each filter to reference filters in your logic statement.
- Click Save button. It will appear in the listview drop-down list so you can access it later.
Below are the steps that you can optionally opt to choose and order the columns in your list view.
- Select Fields to Display from the List View Controls menu.
- To add columns, you can select one or more fields from Available Fields and use the arrow to move them to Visible Fields.
- To remove columns, you can select one or more fields from Visible Fields and use the arrow to move them to Available Fields.
- Order columns by selecting one or more fields from Visible Fields and using the arrows to move them up or down.
- Click on Save button.
Here’s a List view showing records filtered by the criteria in Lightning Experience.
Happy Salesforce !!!


